RV Air Conditioning Secrets That Changed Everything
Written by Nancy Carter of Making My Own Lane
This article contains affiliate links. We will make a commission when you make a purchase at no cost to you, but it helps keep me on the road! Thanks for your support.
How to Keep Your RV Cool This Summer
Today we're tackling one of the biggest challenges of RV life – keeping your RV cool when temperatures soar outside.
If you've spent any time living or traveling in an RV during summer months, you know exactly what I'm talking about. That greenhouse effect is real! These metal and fiberglass boxes we call home can heat up FAST, turning your cozy space into an unbearable sauna in no time.
But here's the good news – after three summers of full-time RV living in arguably the hottest and most humid region in the country, Florida, I've figured out a comprehensive cooling strategy that works. And the game-changer in my setup? My Dr. Prepare 10,000 BTU portable air conditioner with WIFI.
I'm going to share everything I've learned about staying cool in an RV, with a special focus on how to maximize the efficiency of a portable AC unit that's been absolutely essential for my comfort. We'll cover installation, optimization, maintenance, and combine it with other heat-beating strategies to create a comprehensive cooling system for your RV.
Understanding RV Cooling Challenges
When I was thinking about spending May, June, July and some of August in Florida this summer, I knew I had to find a solution to staying cool in my RV,
For the past 2 years, I swore I would never be in Florida after Memorial Day, and even that’s pushing it with the heat. And I have headed north in search of cooler temps.
But this year, I really wanted to stay in Florida and travel to some very hot Florida destinations that are more difficult to get into when it starts to cool off in the rest of the country.
So, in January, after some research, I decided to purchase the Dr. Prepare portable AC unit and test it out.
Before we talk solutions, let's understand the problem.
RVs heat up much faster than traditional homes for several reasons:
First, they have less insulation. Most RVs simply don't have the thick walls and insulation of standard houses. Even the best-built RVs typically have thinner walls with less space for insulative material.
Second, they have proportionally more windows relative to their size. While windows are great for natural light and views, they're terrible for temperature regulation. They let in massive amounts of solar heat and offer minimal insulation.
My double-paned windows help, but a Lazy Dazes RV has the biggest windows all around, to allow for amazing panoramic views, and let a lot of heat and cold in.
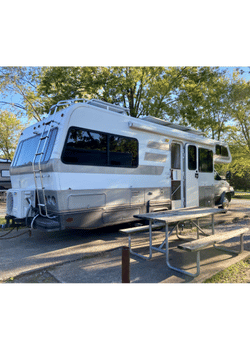
Third, RVs are often made with metal exteriors, which conduct heat extraordinarily well. That aluminum skin that makes your rig lightweight enough to tow? It's also excellent at transferring outside heat indoors.
To make matters worse, many RVs come with rooftop air conditioners that, frankly, aren't always up to the task – especially when you're boondocking without hookups or dealing with extreme temperatures.
I've recorded temperatures of over 100°F inside my RV when it was only 85°F outside! And that's WITH reflective window coverings and vents open for airflow.
This is where supplemental cooling becomes essential. The Dr. Prepare portable air conditioner has been my solution of choice because it's:
Compact enough for RV spaces
Powerful enough to make a real difference
Energy-efficient enough to run on many power setups
Versatile enough to move around as needed on travel days.
Let's take a closer look at this unit and how to integrate it into your RV cooling strategy.
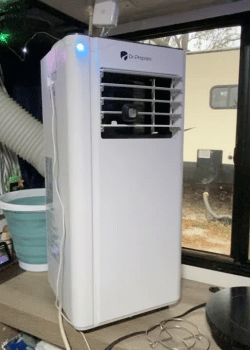
The Dr. Prepare Portable AC unit
The Dr. Prepare portable air conditioner is specifically designed for smaller spaces, making it ideal for RVs. Here are the key specs you should know:
Cooling capacity: 8,000 BTUs, but there are other sizes available for larger rigs
Dimensions: 12.4 inches wide, 12.2 inches deep and 27 and a half inches high.
Weight: Approximately 45 pounds
Power consumption: 780 watts
Features: Digital controls, remote operation, multiple fan speeds, programmable timer
Additional functions: Dehumidifier mode, fan-only mode.
It can dehumidify up to 46 pints or 22 liters a day.
What makes this particularly suitable for RV use is its size-to-performance ratio. It's powerful enough to cool a typical RV main living area but compact enough to store when not in use – a crucial consideration in our limited spaces.
It does take up a bit of space; however, everything in RV life is a choice and a sacrifice. And I am more than willing to sacrifice some space in order to keep my home at a comfortable temperature, even when it’s 97 degrees and super humid outside, or 88 degrees and you are parked in full sun.
Unlike many portable ACs designed for residential use, the Dr. Prepare won't overwhelm your RV's electrical system when connected to shore power, if you don’t run other high energy appliances at the same time, like a coffee maker, ice maker, or microwave, and in some configurations, it can even be run from a robust solar/battery setup – something we'll discuss more later.
The unit features a window exhaust kit for venting hot air, a drain hose for dehumidification mode, and simple controls that anyone can master. It's also relatively quiet compared to many competitors, which matters a lot in small RV spaces where you're never far from your appliances.
I want to be fully transparent – in my small space, this does cool my entire RV. I use it more like dual zone cooling system. The portable unit for the main living area and kitchen and my mini-split for the back bedroom. I found that pushing cool air through the small hallway in between, even with a fan, just didn’t allow the entire RV to stay as cool as I like it in extreme heat conditions. In my experience, it can lower the temperature in my 20-foot RV by about 10-15 degrees in under an hour.
Now let's talk about how to install and optimize this unit in your RV.
Installing a Portable AC Unit in Your RV
Installing the Dr. Prepare in an RV requires some creativity, as our windows aren't exactly like residential windows that most portable ACs are designed for. Here's my step-by-step process:
First, identify the best location. You want to place the unit where:
It's close to a window for venting
It won't block essential walkways
It can direct airflow to living areas
It's near a power outlet
I've found the best spot in my Class C RV is the sliding upper bunk window, but your layout may differ.
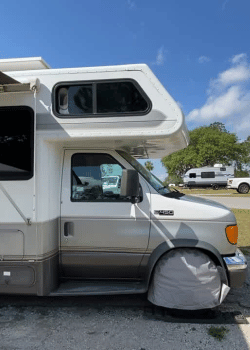
Option 1: If you have a sliding RV window, you can often use the included kit with minor modifications. I simply did not use the window adapters. Instead, I created a simple adapter making a template of the exhaust hose hole from heavy duty Reflectix and taped it together, then attached it to the window with duct tape. Because there’s a screen there, bugs can’t get in, and I can still shut the window if there’s a storm or on a travel day. I leave this attached all the time, so I can pack away or set up the portable AC unit and get that ac back on quickly when I get to a new destination.
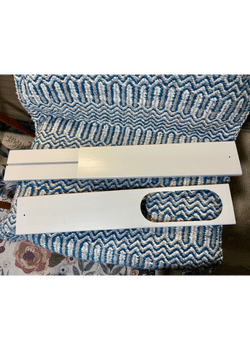
Option 2: For non-sliding or larger windows, it does come with 2 plastic extenders to attach the exhaust hose and seal off the rest of the window.
Don’t forget that RVs move! You need to secure the unit for travel days. This unit does have wheels! On a travel day, I place the unit on the floor, between 2 other heavy items that I know won’t move, which prevents the ac unit from sliding around when we're on the road.
I know that if I were going to be traveling through more mountainous territory, I would probably have to secure it a little better.
For power, the Dr. Prepare draws about 780 watts. This means you'll want to connect it to a proper outlet in your RV – preferably one on a circuit without other major appliances. When boondocking, you'll need to carefully consider your power capabilities, which we'll discuss shortly.
Once installed, test everything thoroughly. Check for air leaks around your window adapter, make sure the exhaust is venting properly, and confirm the drainage system is working if you're using the dehumidifier function.
Tip: position the unit to maximize airflow throughout your RV. In my setup, I use a use a small fan to help circulate the cooled air to other areas of the RV, which dramatically improves efficiency.
Power Considerations
Let's talk about one of the most important considerations for running any AC in an RV – power requirements.
Here’s the controversial side. You may not agree with how I power this thing up, but, it works for me.
When connected to shore power at a campground, the Dr. Prepare draws approximately 780 watts during operation. Most RV parks provide 30-amp service, which gives you about 3,600 watts to work with, or 50-amp service with even more capacity. This means the portable AC can run comfortably alongside most of your other appliances when connected to shore power.
Because this portable AC unit takes quite a bit of juice, I don’t like running this through my 30 amp RV power, so I use a 50 amp adaptor to run my RV, and a 30 amp adaptor that I run to the portable ac unit. Or you can use a split 50 adaptor and plug into the 50 amp service only.
This doesn’t mean that my 30 amp rv can magically run 50 amps worth of gadgets. Because I have found that some campgrounds offer only 30 and 50 amp plugs, and no 20 amp, but they all almost offer both 30 and 50 amp on the power pole, I set this up so I don’t have to switch it every time I get to a new campground.
I have a heavy duty 20 amp extension cord to run the portable ac off of, connected to a surge protector that I plug only the ac into. A dedicated line, if you will.
This also means that if the power at the park goes, I will loose the cooling effects of the portable ac unit, as it is not set up to run off my solar energy.
However, if this should happen and the power goes out, I do have my minisplit that does run the ac off the solar set up, and would still be able to cool my RV into the mid 80’s all by itself, and still keep my dogs safe until I could get back.
My wifi thermostat has an alarm set up to notify me if the temperature in the RV goes above 75 so I could check from wherever I am and see what the situation is.
What about when boondocking? You have two main options: generator power or solar/battery power.
Theoretically, I could run the portable AC unit through the RV electric, but it would eat through my power fairly quickly, even on a sunny day.
You could also run it off a generator. For generator use, you'll need at least a 2000-watt inverter generator to comfortably run the Dr. Prepare. I recommend the Wen 3600-watt portable inverter generator which provides enough power while remaining relatively quiet. Remember to account for generator startup surge when the compressor kicks on.
For solar and battery power, this gets more complex. The Dr. Prepare draws about 780 watts continuously when running. To power it through a typical day of operation, you'd need:
A robust battery bank (I recommend at least 300Ah of lithium capacity)
A large solar array (minimum 600 watts, preferably more)
A pure sine wave inverter rated for at least 2000 watts
Let's be realistic – running any air conditioner on solar is challenging. In my setup, I can run the Dr. Prepare for about 8 hours on my battery bank or one hour on my portable power banks, if they are fully charged. This works for taking the edge off during the hottest part of the day, but not for 24/7 cooling.
My strategy is to use a combination approach: run the portable AC during the hottest hours when my solar production is highest, then close off my bedroom when I’m sleeping and just cool that area, using less electricity.
To maximize runtime, use the unit's power-saving features like programmable timers, temperature-based auto-shutoff, and sleep mode.
Optimizing Performance
Now that we have the Dr. Prepare installed and powered, let's talk about getting the most cooling power from it.
First, strategic positioning makes a huge difference. Cool air falls, so placing the unit slightly elevated helps with circulation. I have mine on a counter top about 3 feet off the floor.
Second, manage your airflow. You can adjust the ac flow side to side and up and down, as needed. During the day I find myself getting cold, but I don’t want to shut the ac off and have the RV heat up quickly, so I will adjust the flow up.
And then there are times when I come in after spending time out in the heat, where I want all of the cold air hitting me directly!
Third, regular maintenance is super important. Clean the filters daily on the portable AC unit when in heavy use – otherwise weekly is fine. Clogged filters can reduce efficiency by up to 30%! Also check the exhaust hose and connections to ensure there are no air leaks.
Fourth, consider zoning your RV. By closing doors or hanging thermal curtains to partition your space, you can focus the cooling power where you need it most. I often cool just the main living area during the day, then shift to cooling the bedroom area shortly before sleep.
I find that when conserving power and trying to stay cool in the summer, or warm in the winter, this technique makes a huge difference.
Fifth, monitor your temperatures. I use inexpensive digital thermometers in different zones of my RV to track effectiveness. This helps me adjust my strategy based on real data rather than just how it feels. I’ll leave a link in the description for the digital, wifi capable thermometer that I use to monitor the temperature in my RV, especially when I have to go out and leave the dogs at home on a hot day.
It’s also programmable, in the sense that if the temperature goes over a certain degree, I will get a notification on my cell phone so I can see what’s going on and determine if I need to get back home quickly or not.
Finally, use the programmable features on the portable air conditioner unit intelligently. I set my unit to reach my target temperature in the morning before I need it, rather than waiting until the RV heats up. This saves significant power while still keeping the space comfortable when it matters most.
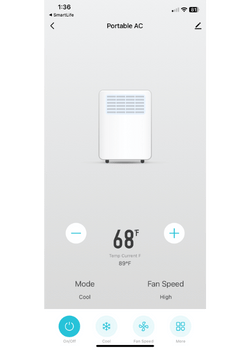
My favorite thing about this air conditioner is that it is wifi capable, so not only can I check the temperature in the RV when I’m not home so that I know my dogs are comfortable, I can raise and lower the temperature or turn the blower speed up and down with the app on my phone, from wherever I am.
Complimentary RV Cooling Strategies to Keep Your RV Cool
The Dr. Prepare portable AC works best as part of a comprehensive cooling strategy. Here are the complementary approaches I use to maximize cooling while minimizing power consumption:
First, reflective window coverings are absolutely essential. These reflective surfaces can reduce the heat entering through windows by up to 60%, which means your AC doesn't have to work as hard.
Second, address your roof – the largest surface exposed to direct sun. Try to park under a tree if possible. This creates an air gap between the sun and your roof, dramatically reducing heat transfer.
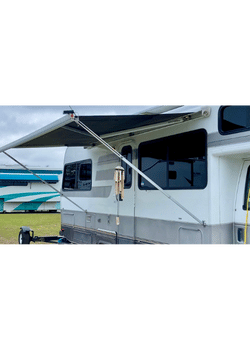
Third, use your awning strategically. Extending your awning on the sun-facing side of your RV creates shade not just for your outdoor space, but reduces heat transfer through those walls and windows too.
Finally, reduce internal heat sources. LED lighting, cooking outdoors, and using the microwave instead of the stove can all significantly reduce the heat generated inside your RV.
When combined with the Dr. Prepare portable AC, these strategies create a comprehensive cooling system that's far more effective than any single approach alone, including using just my mini split air conditioner on those days when the temperature outside is well over 90 degrees, and the humidity level is 87%. I can maintain a 73 degree temperature and a 67% humidity level using this combined method.
Troubleshooting Common Issues
Let's address some common issues you might encounter with the Dr. Prepare and how to solve them:
Problem 1: Water buildup. In high humidity environments, you may notice water collecting faster than it can evaporate. The solution is to connect the drain hose and direct it to an appropriate drain or collection container. I use a 4.5 gallon collapsable bucket to manage this in my setup. And in the hotter, more humid months, I was emptying the bucket twice a day.
I finally figured out a way to run the drain hose from the portable AC unit directly outside, without having to cut a hole in the outside of the RV, but it took a little creativity and a LOT of thinking.
I highly recommend doing this, if you can. It will save you the headache of having to empty a heavy bucket every 4 to 6 hours.
Problem 2: Power fluctuations. If your power source isn't stable, the unit may shut down unexpectedly. I recommend using a surge protector and, if possible, a small UPS (Uninterruptible Power Supply) to buffer minor fluctuations and protect your ac unit.
Problem 3: Insufficient cooling. If your unit seems to be running but not cooling effectively, check the filters first – they're easy to clean and are often the culprit. Make sure nothing is blocking the vents, like curtains. Also verify that your exhaust hose hasn’t been knocked loose or come separated from the unit, is properly venting hot air outside and isn't kinked or restricted.
Problem 4: Thermostat accuracy. I've found that the built-in thermostat sometimes needs calibration. I use a separate digital thermometer as reference and adjust my settings accordingly.
Remember that no portable AC is magic – they all have limitations. If outside temperatures are extreme, expect that your portable unit will help but may not be able to cool your entire RV to a chilly 68°F. Be realistic about what's possible in your specific conditions.
I have found I can keep my RV about 20 degrees cooler than the outside temperature, and the humidity about 15% lower. So if it’s 98 outside, my expectation is 78 inside. Still a little hotter than I like it, but much better that the 10 degree difference I was getting last year on super hot days. I was miserable
Is the Dr. Prepare Portable AC unit a good cooling solution?
There you have it – a complete strategy for staying cool in your RV using the Dr. Prepare portable air conditioner, along with complementary approaches that maximize its effectiveness.
The key takeaways:
Install your unit properly with a secure window adapter
Understand and manage your power requirements
Optimize performance through positioning and maintenance
Combine with other cooling strategies for maximum effect
Know how to troubleshoot common issues
RV life doesn't have to mean suffering through heat waves or being tied to campgrounds with electrical hookups. With the right equipment and strategies, you can stay comfortable almost anywhere.
The Dr. Prepare portable AC unit is the only reason I am spending time this summer in central and south Florida.
And even though I purchased this product on my own, Dr. Prepare has given me a coupon code to share with you to save 8% off their portable AC unit, to help you stay cooler this summer as well. Just use code MMOL8 at checkout.
I'd love to hear about your RV cooling solutions. Click here to leave a comment. What works for you? Do you have questions about the Dr. Prepare or any of the strategies we've discussed today?
If you found this helpful, you may want to check out some of my other RV product reviews or helpful resources to help make you RV adventures even more memorable and enjoyable.
You can watch my YouTube video review here!
Subscribe below for more updates as we travel.
Thank you for subscribing!
Have a great day!
Other posts you might like:

Hi there! I'm Nancy.
In 2023, I ditched my heels for hiking boots, sold my house, and decided to travel the US full time in my 2005 Lazy Daze Class C RV.
I love to share the places I travel to and what it's like to live in an RV full-time.
If you have ever thought about hitting the road and traveling in an RV, either in your free time or full time, you are in the right place!
Follow along for weekly blog posts about my adventures as I travel the US with my two dogs, Rufus and Willie, and my cat, Katie.
